Somewhere I can let out my inner crafter without being labeled as even more insane.

Dusting this off again!

So *gestures vaguely at the dumpster fire*, lets’ move on shall we! I’m basically restarting (let’s nor provaricate!) this blog because I’ve started sewing, and need somewhere to document things other than my brain and a messenger chat which moves too fast to scroll through!

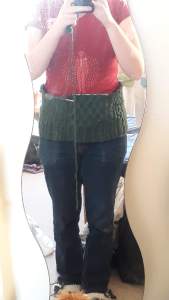
So this is the third iteration of the shirt (the other two are muslins). First muslin was too big overall, second muslin I went down a size which mostly worked. The sleeves needed shortening, the shoulders needed taking it (I went for a thumbs width here, which isn’t quite enough, especially if you look from the back), and I needed to grade out for the hips. Thsi is the smallest size grading out to the next size after the waist.

Changes to make next time:

  • Take in the sleeves a good 4 inches (2 each side)
  • Raise the waist a ‘smidge’. I’m guessing this is why it raises and I have to keep pulling it down (I say keep, I don’t mind that much). I’ll check how much it raises by and raise the waist that much.
  • Take in the shoulder seams again. Not by much, and I’ll actually measure it next time… and do it on the yoke and the back piece, rather than fudge it all on the yoke bc I forgot when cutting the back piece. Doh!
  • Lower the yoke some at the neckline. It’s difficult to see in these pictures, but it’s bunching at the back at the neckline. I wasn’t sure whether it was because there was too much fabric in the up-down direction, or not enough in the left-right direction, but I finally found another blogger with a similar (on a smaller scale) issue who took fabric out so let’s go with that (it also doesn’t feel tight at all accorss the back, which I guess it would do if it was too tight… I’m flying by the seat of my pants here, can you tell?)
  • That last one I’m hoping will bring in the collar a smidge too. Otherwise that’ll stay the same this time around and try again after.

This time will be my first try at tracing the pattern onto pattern paper before sewing, which I’m kinda excited about, and also annoyed at it taking more time. I’m sure it’ll be worth it in the end 🙂

Side note- I am still knitting, crocheting, cross stitching, plan to embroider these clothes, want to get into polymer clay, etc. It isn’t going to just be sewing! (Although a lot over the summer may be, and while I get to grips with pattern adjusting!) (p.s., where do I put the tags?)

Fell: after the sleeves

My first attempt for the sleeves started at 24 stitches. This was “on the tight side”, and eventually I came to my senses and frogged back to start on 28 stitches. Much nicer! I also did a new cast on- basically the cast on for double knitting (the fabric, not yarn weight), and then move stitches around so it all flows nicely. I didn’t make a note of how many increases I did (why would I do something that sensible??), and I did the shoulder cap shaping as stated. It seems a smidge small, so I’ve left the yarn attached so I can more easily frog and reknit if it is too small. (It’ll depend on how big the shoulder shaping is on the body, etc).

I am…not sure I’ve got enough yarn. I ordered half as many skeins as the pattern calls for (I have 5), beause I have twice as much yardage as the yarn the pattern calls for….and I used most of 100g on each sleeve. Leaving me about 3.5 balls for body, collar (and it’s a big collar) and button band. We’ll see. I’m not that fussed about dye lots (watch that come and bite me later!), and it’s not like I’ll have much of a choice if I have to get more anyway… *sigh*

I’ve also found some nice antler buttons, but the shop only had 5, so I emailed them asking whether that was a glitch/when they’ll get more. Hopefully I’ll be able to get them in January (it’s one of my goals:) )

Now, on to knitting the body. I double checked on a favourite jumper, and apparently I actually want this 20 inches accross. *sigh* This is why we check (I had thought I wanted smaller than the smallest size, and instead I want between the second and third sizes. *eyeballs yarn again*). Whhhhhich still ends up being too big when I add in my gauge issues.

Ok, so the smallest size back will come out at 21.5 inches. 1.5 inches is 18 stitches (I have 12 stitches to 4 inches), so let’s go with 46 stitches for the back, and, 9 stitches off each of the fronts for 23 stitches each. This seems wildly wrong (for one thing, this doesn’t include space for the button band), but we’ll try 92 stitches anyway. I can always frog back if necessary (one of the things I’m trying to get better at is frogging when necessary).

Time to get knitting!

Fell: Planning stage

I’ve decided to take on a more measured, thoughtful plan for this blog (and life in general!). Specifically, to think and prepare more for each thing I make and how I should change bits to suit me more. And also document how I go about planning things for others to see and maybe take inspiration from (if anyone knows other blogs that do this I would be delighted to hear about them 🙂 )

The pattern I’m talking about today is Fell (Ravelry link), also available here (Rowan website). I’m using a dark red yarn from Brooklyn Tweed (Quarry, I had to buy it from a Canadian website and get it shipped over here to the UK).

First step is a gauge swatch. I get 12 stitches to 4 inches (4.5mm needles), the pattern calls for 14 stitches. I like the fabric I have, so I’ll reduce the numbers to make it work. The size I want is the smallest, so I can’t just sneakily knit the next size down. The last page of the pattern has blocking measurements, and I like the length of the sleeve, but the body seems a bit long. I’m doing the sleeve first for a number of reasons, and there’s some interesting stuff going on with the body anyway.

The next step is to have a look at the project notes- most people don’t have much to say about this. A few people say it comes out big, a few others say it comes out true to size. One person specifically mentions the sleeves are wide, so I check that- I’m going to be making the smallest size, and according to gauge the sleeve comes out at 14 inches around. I want about 12, so I definitely need fewer increases.

So, I want about 2 inches fewer, which if I had gauge would be 7 stitches. (Lets round that down to 6, because even numbers are much nicer for sleeves). Given that the pattern only calls for 10 stitches increase, I think I’m also going to need to reduce the number of stitches I cast on for the ribbing of the sleeve. In the first instance I’ll guess at 6 (I would usually do half, so 4, but then I’m also knitting it in the round and you lose 2 stitches to sewing up so I’ll take out 6 and see how it goes). I can always frog if things don’t work out.

Looking through the pattern gives some interesting gems as well. The pockets- when I helped a friend do a simpliefied version of this pattern, we omitted the pockets because I couldn’t figure what was actually going on with them. Looking back at them now, I have no idea what I was thinking because they make perfect sense…*facepalm*. So I’ll be doing the pockets as written, or maybe making them slightly deeper (at the moment the opening goes all the way down to the bottom of the pocket, which to me feels like it’s a recipe for things Falling Out). The other thing about the pattern is that the sleeves and body pattern has to match at the underarm. This is…slightly awkward if you only notice when you want to start the sleeve cap. I’ll be getting around that by doing the sleeves first, and seeing where on the sleeve I want to start the body patterning, and work off that.

I’m also going to knit the sleeves in the round and the body all in one piece, because what sort of heathen doesn’t? (This is a joke. There are many reasons why you may want to knit sleeves flat, and the body in pieces and seam. If I didn’t hate seaming so much I would do so 😉 ). The only other thing I think there is to say is that I’m going to try and find some antler buttons for it, because I’m trying to use less plastic and antlers seem really cool!

So, my total plan of attack for this jumper:

  • Knit the first sleeve cuff and edit the number of stitches if necessary
  • Knit the second sleeve cuff, and then the sleeves at the same time, in the round (I have a very bad history of sleeves not matching if they are knitted separately, and I quite like TAAT knitting)
  • Check numbers for the body, and cast on for both fronts and the side together. I will consider putting in a fake seam down the sides, but probably won’t bother
  • When I’ve finished the ribbing for the body, ascertain where on the pattern to start the main body
  • Knit the rest pretty much as standard. Play around with numbers again for the button bands- I should make sure I have buttons before starting the button band, so that I can make sure I get the button band big enough, and the buttonholes the right size.

Time to get knitting I suppose!

So yeah, long time no see. Life has been crazy, and is definitely not planning on slowing down until August at the earliest.


Anyway, I inherited my mother’s old sewing machine, and pulled it out to shorten some jeans. No pictures because I am focussed, but have some timings:

I had 4 pairs of jeans to shorten. Because I am a muppet very enthusiastic I didn’t note what time I started, so the first jeans took more than 15 minutes to do. I then did the other three pairs all together, which took an hour to cut and pin, and then an unknown amount of time to hem them all. (I know, I really rock this timing thing…). I think had to support the thighs in one of the pairs (thinking back I should’ve done all of them…), for which I used the offcut from the hems. It took an hour to hem and support the thighs, so in total maybe 2 and a half hours??

In future, I hope to have more accurate timings for things (I’m recording time spent knitting etc as well, it’s a bit of a learning curve to get used to it, but I think it will be useful and eye opening to learn how long things take me!)

I’m really pleased with how this came out

It fits almost perfectly, I’m very happy with the legnth (no better picture bc my lap is now owned by the cat…). Trying it on so many times definitely helped, and it ended up being a smidge longer than I thought I wanted. Lol!

After the kerfuffle with my last jumper, I wasn’t at all confidant about my shoulders fitting properly, and so I left the balls of yarn attached to more easily frog (I don’t think this yarn would like being frogged at all!), but in the end it all fitted perfectly up there. I think I really like this saddle shoulder idea, it’s quite novel to have the sleeves come up and over! And I think it was easier to sew than trying to fit a sleeve into a body more ‘normally’. Definitely one to try again at some point!

The only thing I’m not too happy with is the sleeves.

The inside of the sleeve is considerably baggier than the outside. I was thinking this while knitting them and now I’m kicking myself for not quickly washing them to check, rather than doing the ‘oh, it’ll come out in the blocking’ nonsense. *sigh* If I’d’ve checked I could’ve thrown in some short rows to deal with some of the excess, particularly around the elbow. Oh well, I guess time will tell on whether it will eventually just stretch out…

Now that it’s done, I kinda miss having it around to knit on. After not being at all sure of the cables in the beginning, they rather grew on me. Oh well, onto the next knitting project I guess!

So, in between working, having a few mental breakdowns, losing my sleep schedule, I’ve also been crafting up a storm. More detailed posts will follow, but this is just an infodump to get it out of my head!


I finished the Paris sweater(this is the most recent picture I have of it, it will get its own photo shoot when I work out logistics)

I started knitting with my handspun!!!

(Again, old most recent pic!)

I’m doing a massive amount of spinning!

Some crochet

and I’m still cross stitching the 50 shades of blue

Longer posts to come on most of these!

More spinninggggggg

I’m having a whale of a time with the spinning at the moment, even though it’s decidedly not my favourite spindle. I finished the blue

It’s very smooshy and warm and I pet it routinely. (it’s sat next to me right now). It’s a very gently 2ply, which I love after the chunkyness of the 4ply I ended up with.

I’ve hit 10 WPI (which apparently makes it thicker than DK, which I’m not sure I believe at all). And I’ve got about 220 yards, which is hard to measure without a niddy noddy, so I may be off. I think it wants to either be a hat or a scarf/shawl thing, but it’s going to have a few days more to decide before I cast on.

And I was going to have a break and finish the jumper, but then I tripped and started this. Spinning from rolags wasn’t my favourite at the start but I think I’ve got the hang of it now. I’m thinking I’ll knit a scarf diagonally- I want to keep the width the same for the stripes, but slightly more interesting than just knitting. Suggestions happily taken!

Quite how I got the stripes I have no idea! But hey ho. Turns out I need more of the fluff. Luckily they had one more braid of it in the shop (it’s not at home with me!). Along with quite a lot of other fibre! Hopefully soon it will be spun and I can get on with this! In the meantime, I’m having fun with other fluff!

Stay sane, everyone!

So, many many moons ago (ok according to ravelry I started them 2 years ago yesterday!), I started some socks. I decided that now would be a good time to drag them back out and have another stab at finishing them.It’s rather strange knitting a sock from the cuff down after doing so many toe up, but I think I’m liking the challenge!

Jumper weather

One of the projects while on lockdown is this really nice green cabled jumper. I finished the sleeves before lockdown started, and I’ve been getting on quite well with It fits! I tried it on for the first time yesterday, and it fits pretty well. I’m very happy with this, and am carrying on with it at a rate of knots. It helps that the pattern is really easy when it’s been set up, and there aren’t any fiddly increasing/decreasing so it really does count as almost mindless knitting.

Have another picture of the main cables slightly more close-up

Back to the knitting now I guess!

Tag Cloud

Mainelymenswear

Be your own luxury brand !

Blog - Jillian Moreno

Somewhere I can let out my inner crafter without being labeled as even more insane.

Wool n' Spinning

a shared passion for handspun yarn

Felting and Fiber Studio

An International Collective of Felt and Fiber Artists

Yarn Harlot

Somewhere I can let out my inner crafter without being labeled as even more insane.

Attic24

Somewhere I can let out my inner crafter without being labeled as even more insane.

Julia's Creative Year

my year of trying to be more creative in different ways

Vix Knits... and crochets and sews...

My adventures in the wonderful world of arts and crafts

Cables and Colours

Somewhere I can let out my inner crafter without being labeled as even more insane.

craftandothercrazyplans

Trial and error-the best way to learn

Backstrap Weaving

By Laverne Waddington. My weaving , my inspiration, tutorials and more........

Agujas

The Art of Knitting

Dartmoor Creative - Bekki Hill

a creative life on Dartmoor

IntrovertedKnitter

Fiber Artist and Introvert making her way through an Extrovert Centered World

Hufflestitch

Cross-stitch Project Progress and Random Life Updates

FogKnits

Yarn Collecting and Occasional Knitting